azure에서 제공하는 public template을 살펴보면서 MLOps 파이프라인을 이해해 보겠습니다.
그리고 mlopw-v2/documentation/deployguides/deployguid_gha.md를 따라서 다음과 같이 수행해줍니다.
•
gh 설치 & login (github cli)
◦
linux는 apt-get install gh / mac은 brew instll gh
◦
gh auth login
◦
이는 간단한 키워드만으로 레포지토리 clone / pull request 등을 수행할 수 있다.
•
WSL을 사용하는 경우 dos2unix를 설치해준다.
•
git config가 되어있지 않으면 다음을 수행한다.
◦
git config --global user.email "you@example.com"
◦
git config --global user.name "Your Name"
완료되었으면 sparse_checkout.sh를 실행해주세요. (sh파일의 앞부분을 본인의 설정에 맞게 조금 수정해주어야 합니다)
잘 실행이 되면 다음과 같은 private repository가 생성됩니다.
project의 구조 살펴보기
이 프로젝트의 전체적인 구조는 다음과 같네요
.
├── CODE_OF_CONDUCT.md
├── LICENSE
├── README.md
├── SECURITY.md
├── SUPPORT.md
├── config-infra-dev.yml : 개발용 infra구성. workflow에서 $GITHUB_ENV로 추가해준다.
├── config-infra-prod.yml : production용 infra구성. workflow에서 $GITHUB_ENV로 추가해준다. https://docs.github.com/ko/actions/using-workflows/workflow-commands-for-github-actions#setting-an-environment-variable
├── data : 학습에 사용할 data들
│ ├── taxi-batch.csv
│ ├── taxi-data.csv
│ └── taxi-request.json
├── data-science : ML / DL 관련
│ ├── environment
│ │ └── train-conda.yml : training 위한 conda 가상환경의 yml파일
│ └── src : mlflow로 짜여진 ML/DL 관련 코드들
│ ├── evaluate.py : 평가코드
│ ├── prep.py : 전처리 코드
│ ├── register.py : deploy flag가 True일 때 학습된 ML model을 register하는 코드
│ └── train.py : 모델을 학습하고 학습된 모델을 저장하는 코드
├── environment.yml : azureml-cli-v2사용을 위한 conda 가상환경 yml파일
├── infrastructure : terraform으로 정의된 infrastructures
│ ├── aml_deploy.tf
│ ├── locals.tf
│ ├── main.tf
│ ├── modules
│ │ ├── aml-workspace
│ │ │ ├── main.tf
│ │ │ ├── outputs.tf
│ │ │ └── variables.tf
│ │ ├── application-insights
│ │ │ ├── main.tf
│ │ │ ├── outputs.tf
│ │ │ └── variables.tf
│ │ ├── container-registry
│ │ │ ├── main.tf
│ │ │ ├── outputs.tf
│ │ │ └── variables.tf
│ │ ├── data-explorer
│ │ │ ├── main.tf
│ │ │ ├── outputs.tf
│ │ │ └── variables.tf
│ │ ├── key-vault
│ │ │ ├── main.tf
│ │ │ ├── outputs.tf
│ │ │ └── variables.tf
│ │ ├── resource-group
│ │ │ ├── main.tf
│ │ │ ├── outputs.tf
│ │ │ └── variables.tf
│ │ └── storage-account
│ │ ├── main.tf
│ │ ├── outputs.tf
│ │ └── variables.tf
│ └── variables.tf
├── mlops : mlops관련
│ └── azureml
│ ├── deploy : 배포 관련 aml-cli-v2 명령작업 yaml https://learn.microsoft.com/ko-kr/azure/machine-learning/reference-yaml-job-command?view=azureml-api-2
│ │ ├── batch
│ │ │ ├── batch-deployment.yml
│ │ │ └── batch-endpoint.yml
│ │ └── online
│ │ ├── online-deployment.yml
│ │ ├── online-endpoint.yml
│ │ └── score.py
│ └── train : 학습 관련 aml-cli-v2 명령작업 yaml
│ ├── data.yml
│ ├── pipeline.yml
│ └── train-env.yml
└── requirements.txt
Plain Text
복사
구독 단위의 principal 생성하고 github secrets 추가하기
이 템플릿은 main branch는 production 배포용, 이외의 branch는 개발용으로 배포되도록 설정되어 있습니다.
dev용 (개발용) 리소스 그룹, production용 (상품용) 리소스 그룹이 따로 만들어지기 때문에, 개발용은 용량이 적은 리소스로, production용은 용량이 큰 리소스로 운영을 할 수 있게되고 또한 상품용은 보안이 철저하도록 접근할 수 없도록 인프라를 구성. 브랜치를 따로 만들어서 수행을 하게 된다.
(workflow파일 내에서 if로 정해져있음)
따라서 여러개의 리소스그룹을 생성하는 등의 작업이 필요해서 구독 단위의 principal이 필요합니다. 다음 명령어로 생성해줍니다.
$ az ad sp create-for-rbac --name <service_principal_name> --role contributor --scopes /subscriptions/<subscription_id> --sdk-auth
Plain Text
복사
이를 수행했을 때 출력되는 json을 저장해둡니다
예시)
{
"clientId": "xxxx6ddc-xxxx-xxxx-xxx-ef78a99dxxxx",
"clientSecret": "xxxx79dc-xxxx-xxxx-xxxx-aaaaaec5xxxx",
"subscriptionId": "xxxx251c-xxxx-xxxx-xxxx-bf99a306xxxx",
"tenantId": "xxxx88bf-xxxx-xxxx-xxxx-2d7cd011xxxx",
"activeDirectoryEndpointUrl": "https://login.microsoftonline.com",
"resourceManagerEndpointUrl": "https://management.azure.com/",
"activeDirectoryGraphResourceId": "https://graph.windows.net/",
"sqlManagementEndpointUrl": "https://management.core.windows.net:8443/",
"galleryEndpointUrl": "https://gallery.azure.com/",
"managementEndpointUrl": "https://management.core.windows.net/"
}
JSON
복사
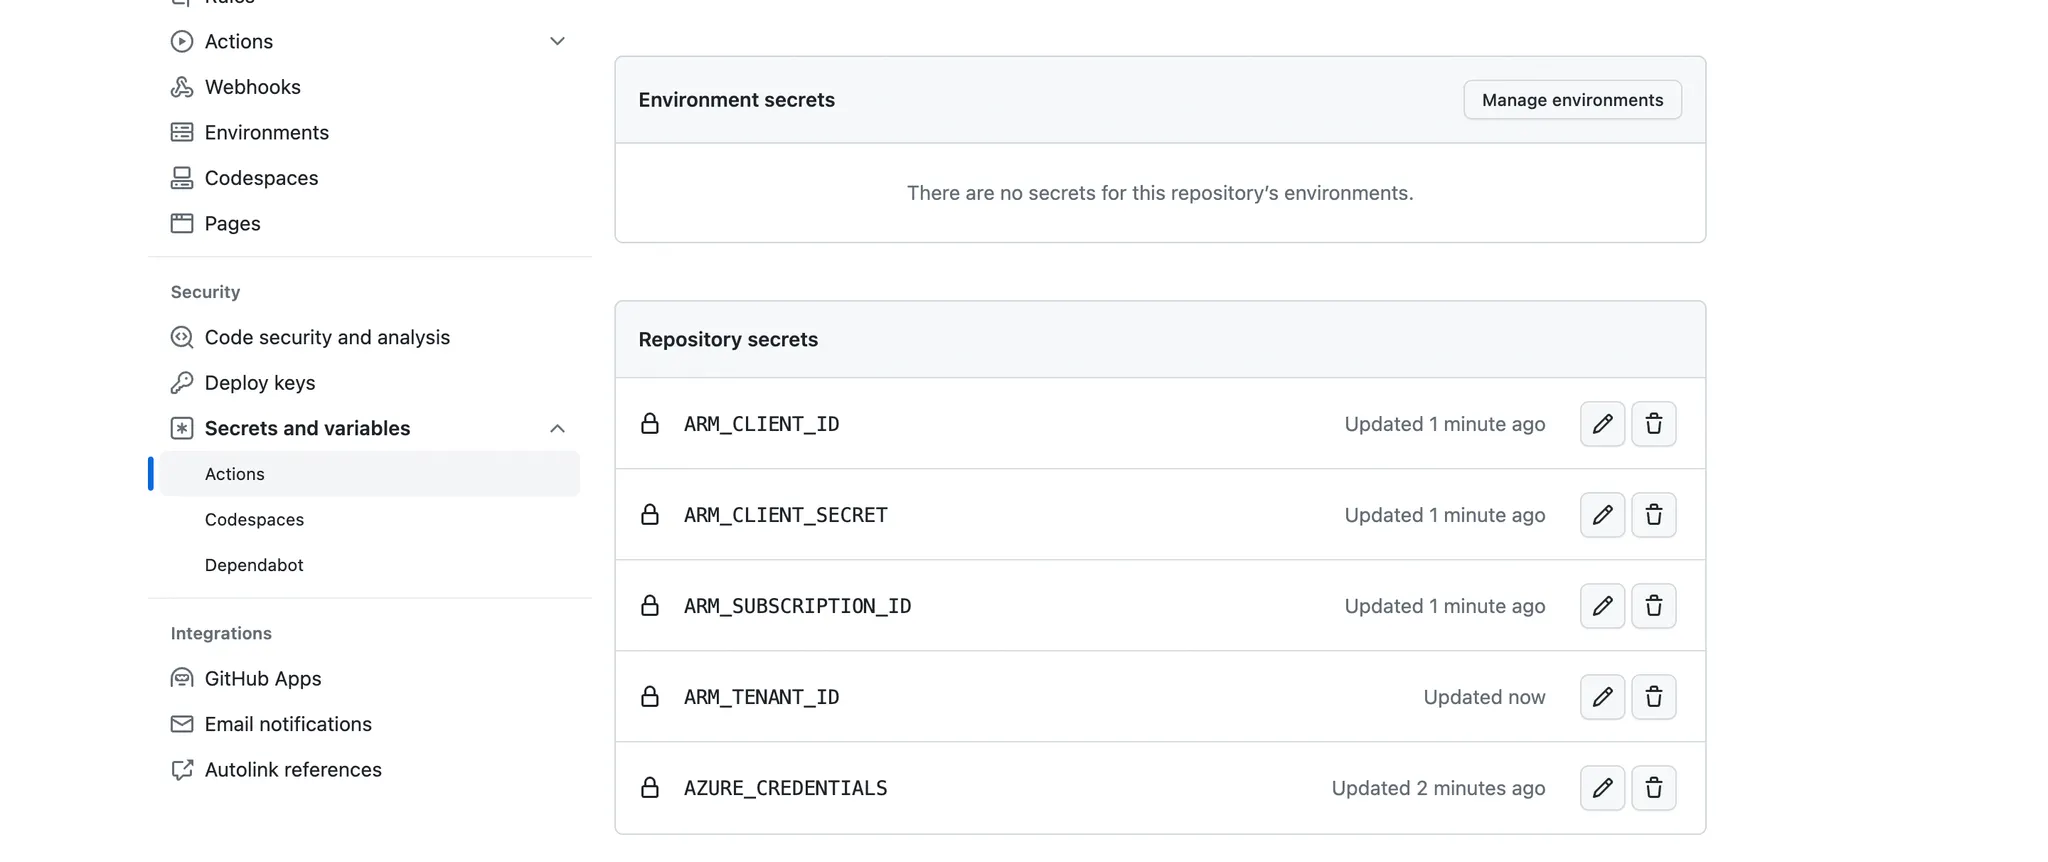
그리고  DevOps[2] github action으로 클라우드 서비스 (Azure)로의 빌드 / 배포 자동화 때처럼 github에 secrets and variables를 추가해줍니다
AZURE_CREDENTIALS: 위의 JSON 전체 문자열
ARM_CLIENT_ID : clientID
ARM_CLIENT_SECRET : clientSecret
ARM_SUBSCRIPTION_ID : subscriptionId
ARM_TENANT_ID : tenantId
terraform으로 인프라 생성하기
이 글의 목적은 MLOps의 전체적인 파이프라인 구성을 이해이므로 terraform에 대한 자세한 설명은 하지않겠습니다. terraform을 통해 인프라가 생성된다는 것 정도만 설명하겠습니다.
인프라 생성에 대한 두가지 yml파일이 존재하는데요, config-infra-prod.yml과 config-infra-dev.yaml파일로 각각 production 환경에 대한 인프라와 개발 환경에 대한 인프라를 정의하는 파일입니다.
•
두 파일에서 location을 koreacentral로 변경해줍니다.
•
개발 과정을 실습하기 위해 dev라는 branch를 생성해주고 checkout합니다.
•
dev branch에서 tf-gha-deploy-infro.yaml 로 정의된 action을 수행합니다.
•
yaml파일을 보고 어떤 동작이 수행되는지 알아볼까요
name: tf-gha-deploy-infra.yml
on:
#push:
workflow_dispatch:
env: # env key를 통해서 single workflow에 대한 custom environment variable을 세팅할 수 있습니다.
config_env: "none" # yml파일이름이 저장될 config_env라는 환경변수 none으로 초기화
jobs:
set-env-branch: # workflow실행 branch에 따라서 개발용 / production용 infra 선택
runs-on: ubuntu-latest
outputs:
config-file: ${{ steps.set-output-defaults.outputs.config-file }}
# set-output-defaults에서 output에 추가된 config-file변수가 이 job의 output으로 정의됨
steps:
- id: set-prod-branch
name: set-prod-branch
if: ${{ github.ref == 'refs/heads/main'}} # main branch이면
run: echo "config_env=config-infra-prod.yml" >> $GITHUB_ENV; # production용 인프라에 대한 yml파일을 환경변수에 추가
- id: set-dev-branch
name: setdevbranch
if: ${{ github.ref != 'refs/heads/main'}} # main branch가 아니면
run: echo "config_env=config-infra-dev.yml" >> $GITHUB_ENV; # 개발용 인프라에 대한 yml파일을 환경변수에 추가
- id: set-output-defaults #
name: set-output-defaults
run: |
echo "config-file=$config_env" >> $GITHUB_OUTPUT;
# 위의 steps에서 config_env라는 환경변수가 사용할 인프라에 대한 yml파일로 정의되있으므로
# 위를 보면 이 job의 outputs에 config-file이라는 key로 정의되어 있다.
get-config:
needs: set-env-branch # set-env-branch가 성공했으면
uses: Azure/mlops-templates/.github/workflows/read-yaml.yml@main
# terraform관련 yml읽어주는 action
with:
file_name: ${{ needs.set-env-branch.outputs.config-file}}
# 앞의 job에서 설정한 config file을 넣어준다.
test-terraform-state-deployment:
needs: [get-config, set-env-branch] # 앞의 job들이 모두 성공했으면
uses: Azure/mlops-templates/.github/workflows/tf-gha-install-terraform.yml@main
# terraform으로 인프라 설치하는 workflow 수행
with:
TFAction: "apply"
dply_environment: ${{ needs.set-env-branch.outputs.config-file }} # 인프라 정의된 yml파일
location: ${{ needs.get-config.outputs.location }}
namespace: ${{ needs.get-config.outputs.namespace }}
postfix: ${{ needs.get-config.outputs.postfix }}
environment: ${{ needs.get-config.outputs.environment }}
enable_aml_computecluster: ${{ needs.get-config.outputs.enable_aml_computecluster == true }}
enable_monitoring: ${{ needs.get-config.outputs.enable_monitoring == true }}
terraform_version: ${{ needs.get-config.outputs.terraform_version }}
terraform_workingdir: ${{ needs.get-config.outputs.terraform_workingdir }}
terraform_st_location: ${{ needs.get-config.outputs.terraform_st_location }}
terraform_st_storage_account: ${{ needs.get-config.outputs.terraform_st_storage_account }}
terraform_st_resource_group: ${{ needs.get-config.outputs.terraform_st_resource_group }}
terraform_st_container_name: ${{ needs.get-config.outputs.terraform_st_container_name }}
terraform_st_key: ${{ needs.get-config.outputs.terraform_st_key }}
terraform_plan_location: ${{ needs.get-config.outputs.location }}
terraform_plan_vnet: "TBD" # TBD
secrets: # 앞에서 설정한 secret들
azure_creds: ${{ secrets.AZURE_CREDENTIALS }}
clientId: ${{ secrets.ARM_CLIENT_ID }}
clientSecret: ${{ secrets.ARM_CLIENT_SECRET }}
subscriptionId: ${{ secrets.ARM_SUBSCRIPTION_ID }}
tenantId: ${{ secrets.ARM_TENANT_ID }}
deploy-azureml-resources: # 성공했음을 표시
runs-on: ubuntu-latest
steps:
- id: deploy-aml-workspace
name: deploy-aml-workspace
run: echo "OK"
YAML
복사
모델 학습 하기
위의 workflow가 성공하여 인프라 생성이 끝났다면 모델 학습 파이프라인을 수행해줍니다.
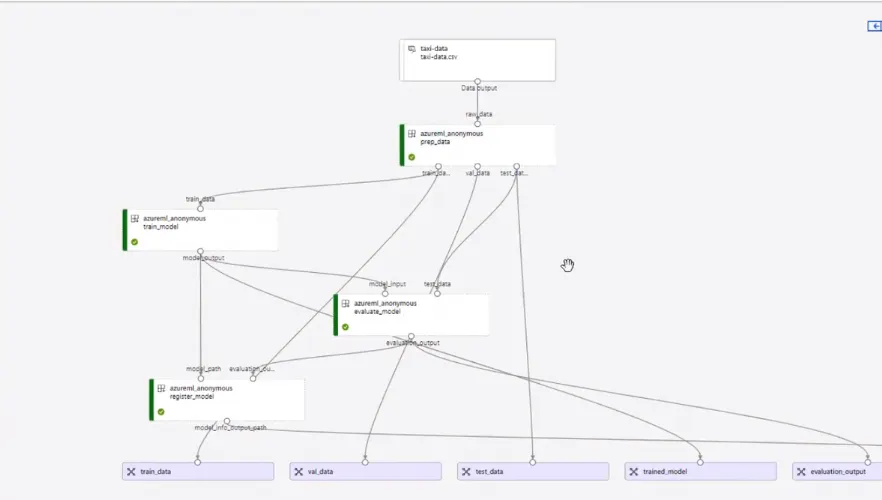
deploy-model-training pipelie action입니다. 배포 직전까지 모델학습을 수행해줍니다.
이런 파이프라인을 생성해줍니다.
workflow yml파일을 살펴봅시다.
name: deploy-model-training-pipeline
on:
workflow_dispatch:
jobs:
set-env-branch: # 위와 같은 인프라 config file 설정
runs-on: ubuntu-latest
outputs:
config-file: ${{ steps.set-output-defaults.outputs.config-file }}
steps:
- id: set-prod-branch
name: set-prod-branch
if: ${{ github.ref == 'refs/heads/main'}}
run: echo "config_env=config-infra-prod.yml" >> $GITHUB_ENV;
- id: set-dev-branch
name: setdevbranch
if: ${{ github.ref != 'refs/heads/main'}}
run: echo "config_env=config-infra-dev.yml" >> $GITHUB_ENV;
- id: set-output-defaults
name: set-output-defaults
run: |
echo "config-file=$config_env" >> $GITHUB_OUTPUT;
get-config: # 이 job 또한 위와 같이 config yaml파일을 읽어와 줍니다.
needs: set-env-branch
uses: Azure/mlops-templates/.github/workflows/read-yaml.yml@main
with:
file_name: ${{ needs.set-env-branch.outputs.config-file}}
register-environment:
needs: get-config
uses: Azure/mlops-templates/.github/workflows/register-environment.yml@main
# 가져온 config를 기반으로 environment를 등록해주는 job입니다.
with: # resource group과 workspace 는 config 파일에서 읽어오고,
# environment_file과 conda_file은 따로 정의해준 파일을 가져옵니다.
resource_group: ${{ needs.get-config.outputs.resource_group }}
workspace_name: ${{ needs.get-config.outputs.aml_workspace }}
environment_file: mlops/azureml/train/train-env.yml
conda_file: data-science/environment/train-conda.yml
secrets: # principal에 대한 json 정보가 필요합니다
creds: ${{secrets.AZURE_CREDENTIALS}}
register-dataset:
needs: get-config
uses: Azure/mlops-templates/.github/workflows/register-dataset.yml@main
with:
resource_group: ${{ needs.get-config.outputs.resource_group }}
workspace_name: ${{ needs.get-config.outputs.aml_workspace }}
name: taxi-data
data_file: mlops/azureml/train/data.yml
secrets:
creds: ${{secrets.AZURE_CREDENTIALS}}
create-compute:
needs: [get-config]
uses: Azure/mlops-templates/.github/workflows/create-compute.yml@main
with:
cluster_name: cpu-cluster
size: Standard_DS2_v2 # DS2_v2로 줄인다. DS3일 경우 deploy에서 quota 이슈 발생
min_instances: 0
max_instances: 4
# cluster_tier: low_priority # 제거. 아마도 특수 quota 가 필요하다.
resource_group: ${{ needs.get-config.outputs.resource_group }}
workspace_name: ${{ needs.get-config.outputs.aml_workspace }}
secrets:
creds: ${{secrets.AZURE_CREDENTIALS}}
run-model-training-pipeline:
needs: [get-config, register-environment, register-dataset, create-compute]
uses: Azure/mlops-templates/.github/workflows/run-pipeline.yml@main
with:
resource_group: ${{ needs.get-config.outputs.resource_group }}
workspace_name: ${{ needs.get-config.outputs.aml_workspace }}
parameters-file: mlops/azureml/train/pipeline.yml
job-name: test
secrets:
creds: ${{secrets.AZURE_CREDENTIALS}}
YAML
복사


